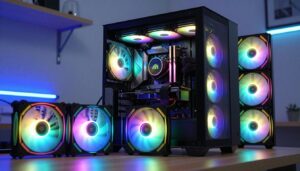

I’m building a budget gaming PC for my nephew and want the lighting to look clean without risking hardware. The Asus ROG Strix B550-F Gaming motherboard gives me a single ARGB header, so I need to plan connections carefully.
The Deepcool FC120 set lets you safely daisy chain up to six units. That limit matters because power and signal strength drop as you add more lights.
I wrote this guide to help you avoid overloading delicate components while keeping your case tidy and cool. I’ll show how to match the header capacity to the fans’ requirements and how to connect the wiring step by step.
Follow along and you’ll learn to manage lighting and power so the ARGB setup works every time without stressing your motherboard or voiding warranties.
Key Takeaways
- I explain safe limits for daisy chain ARGB fans and why they matter.
- The B550-F has one ARGB header, so plan connections in advance.
- Deepcool FC120 supports up to six linked units—watch power and signal drop.
- Proper wiring keeps the case organized and prevents motherboard damage.
- I’ll walk you step-by-step to ensure reliable lighting and cooling.
Understanding the Basics of ARGB Headers
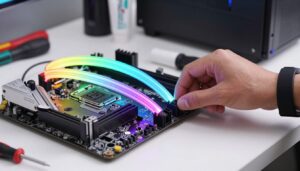
Before you connect anything, I check the connector on the board to know what it does. This saves time and prevents damage. A clear grasp of how the plug works makes the rest of the build simple and safe.
What is an ARGB Header
An argb header is a specialized 5V connector on the motherboard that lets the board control each LED inside a fan individually.
I always read the motherboard manual to confirm the header supplies the correct 5V signal for standard devices. Unlike older 12V RGB systems, this port uses a data line to set color and effects per LED.
The Role of Voltage
Voltage and correct wiring are critical. Supplying 12V to a 5V device will destroy the LEDs instantly.
When I install parts, I make sure the proper header is identified. That avoids shorts and protects both the board and the fan electronics.
| Connector | Voltage | Signal Type | Typical Limit |
|---|---|---|---|
| ARGB 3-pin | 5V | Digital data | Per header specs |
| 12V RGB 4-pin | 12V | Analog | Varies by controller |
| Powered hub | External PSU | Data passthrough | Higher device count |
How to Safely Daisy Chain ARGB Fans
My first step with any multi-light setup is to confirm the argb header limits on the motherboard. That tells me how much total power I can draw before problems occur.
I use Deepcool FC120 units because they officially support up to six linked devices. Still, I add the wattage of each fan so the sum stays below the board’s rated amperage.

I group the fans to keep the case tidy and reduce cable stress. I also align pins carefully during each connection to avoid bent header contacts.
- Confirm the header rating and add each device’s draw.
- Keep wiring short and secured to improve airflow and neatness.
- Use quality parts that list supported chain lengths.
- When unsure, check the manufacturer documentation before you proceed.
Following these steps keeps lighting reliable and protects your hardware.
Calculating Power Draw and Amperage Limits
I always start by checking the board’s specs so I know the safe current limits for LED lighting.
Checking Motherboard Specifications
On the Asus ROG Strix B550-F Gaming, the header is rated for 3A at 5V and supports up to 500 LEDs. I confirm this in the manual before adding any devices.

Converting Watts to Amps
To convert LED watts to amps I use the 5V formula: I = P / V. Each Deepcool FC120 LED draws 1.05W, which equals 0.21A at 5V.
Multiplying that by six gives a total LED draw of 1.26A, well under the 3A limit on the motherboard header.
Managing LED Power Consumption
Remember to separate motor current from LED current. The fan motor is rated at 0.13A and does not count toward the header’s LED load.
I keep wiring tidy and verify cumulative currents so the header does not overheat. That protects both the header and the rest of the build.
| Item | Per Unit | Quantity | Total |
|---|---|---|---|
| LED Power (W) | 1.05 W | 6 | 6.30 W |
| LED Current (A) | 0.21 A | 6 | 1.26 A |
| Fan Motor Current (A) | 0.13 A | 6 | 0.78 A (separate) |
| Motherboard Header Limit | 5V, 3.00 A | Supports up to 500 LEDs | |
- I calculate amps using P/V to avoid guesswork.
- Since six units draw 1.26A for LEDs, the header has ample headroom.
- Always check the motherboard specs and separate LED and motor loads.
Alternative Solutions for Complex Fan Setups
When a build needs more than six addressable lights, I recommend moving the heavy electrical load off the motherboard. This keeps the system stable and avoids stressing one header.
Using Powered ARGB Hubs
I use a powered hub when my case requires extra lighting. A good hub draws direct power from the PSU and leaves the motherboard to handle only the data signal.
In my experience, this setup makes larger installations simple to manage. It also keeps cable routing tidy and reduces clutter inside the case.
- A powered hub offloads electrical draw so the header only sends commands.
- It centralizes connections and improves airflow by reducing cable mess.
- High-quality hubs offer reliable support for many high-performance units.
- If you want to expand later, a hub gives flexibility without risking the board.
| Solution | Power Source | Header Load | Best For |
|---|---|---|---|
| Motherboard-only | MB 5V | Full LED + data | Small builds (≤6 units) |
| Powered ARGB hub | PSU (SATA/Molex) | Data only | Large cases and many lights |
| Controller + hub | PSU + controller | Minimal | Advanced effects and many fans |
Conclusion
I wrap up with a simple checklist so you can finish your build with confidence.
Linking up to six fan units is safe when the total LED draw stays under the argb header limit. I verified that converting watts to amps gives a clear picture of the load.
Always check your specific motherboard manual to confirm max amperage and LED count before you connect devices. If you exceed the limit, a powered hub will handle the extra power and keep lighting stable.
Good planning, careful math, and tidy wiring are the keys I use to get bright lighting without risking hardware. Follow those steps and your rig will look great and run safely.
FAQ
How many ARGB fans can I connect to a single ARGB header on my motherboard?
It depends on the header’s amperage and the LED power draw of each fan. I check my motherboard manual for the per-header amp limit (commonly 2A or 3A) and add up each fan’s LED current. If the total approaches the header rating, I stop and use a powered hub or splitter with external power to avoid overloading the header.
What exactly is an ARGB header and how does it differ from a normal fan header?
An ARGB header is a 3-pin or 4-pin connector on the motherboard that supplies 5V and a digital control signal for individually addressable LEDs. I use it for lighting control via the board’s software. It’s different from a PWM fan header, which supplies 12V and controls fan speed rather than individual LED colors.
Why does voltage matter for addressable RGB setups?
Voltage matters because addressable LEDs typically run at 5V, and supplying the correct voltage ensures proper color control and prevents damage. I always confirm the header voltage on my board and make sure any hub or controller matches that voltage before connecting lights.
How do I safely connect multiple fans without damaging my motherboard?
I follow the motherboard’s amperage limits, use quality splitters or powered controllers, and avoid daisy connections that exceed the header rating. Grounding and solid connectors help, and using an external power-fed hub removes load from the board entirely.
How can I check my motherboard’s ARGB header specifications?
I look in the motherboard manual or the manufacturer’s website for header specs—usually listed as voltage and max current (A). Popular brands like ASUS, MSI, Gigabyte, and ASRock provide clear details. If unsure, I contact support before adding more lights.
How do I convert watts to amps to see if my setup is safe?
I use the formula Amps = Watts / Volts. For example, if an LED strip draws 10W at 5V, that’s 2A. I total the amps of all devices connected to a header and compare against the header’s max amperage to stay within safe limits.
How do I estimate LED power consumption for each fan?
I check the fan’s spec sheet for LED wattage or current per fan—manufacturers often list milliamps per LED or total mA per fan. If they list watts, I convert to amps using the header voltage. When specs aren’t available, I assume a conservative higher value to avoid surprises.
What is a powered ARGB hub and when should I use one?
A powered hub is a controller that supplies 5V power from a separate SATA/Molex or PSU connection and passes control signals from the motherboard. I use one when I need to run many lights or when the motherboard header can’t handle the total current. It keeps my board safe and maintains full lighting control.
Can I mix different brands of fans and controllers on the same header?
Yes, but I take care with pinouts and voltage compatibility. Most 5V addressable devices follow a standard pin arrangement, but I verify each component to avoid mismatches. Using a powered hub can simplify mixed-brand setups and reduce risk.
How do I manage cable routing and connectors for clean installation?
I plan cable paths early, use short extension cables where needed, and secure wires with zip ties or Velcro. I label connectors during installation so I can trace power and control lines quickly if I need to change the configuration later.

Adrian Voss is an RGB lighting specialist and tech writer focused on customization, performance, and smart lighting systems. He shares hands-on insights, reviews, and setup guides to help users take full control of their RGB controllers and create immersive, personalized environments.