I’ve helped many builders light up their PCs without frying a component. In this guide I walk through the simple checks and steps that keep your LEDs safe and your case looking great.
Start by identifying whether your strip is 12V 4-pin or 5V 3-pin (ARGB). The 12V standard shows one color across all lights, while the 5V digital header lets each individual LED show complex rainbow effects.
Mixing a 12V supply with a 5V device can destroy hardware in seconds. Modern motherboards often include both headers, so matching the strip and header is the key first step.
Key Takeaways
- I emphasize identifying your led strip type before any installation.
- Know the difference between 12V and 5V ARGB to avoid damage.
- Match the strip pins and header on your motherboard for safe power and control.
- Use a compatible lighting controller or software for color and effects.
- Organize the case so individual leds shine without glare or shorts.
Understanding RGB Lighting Standards
I start by looking at voltage and signal type so you know what each option does.
Voltage differences determine capability. A 12V 4-pin led strip can only show one color across its length. That makes it ideal for simple lighting applications where uniform color matters.
By contrast, a 5V 3-pin digital option lets each individual led change color. Addressable designs use small microcontrollers and protocols like SPI or DMX512 to send per-pixel instructions. This enables dynamic lighting effects such as moving strobes or rainbow patterns.
RGBW versions add a dedicated white led. That broadens the color spectrum and gives truer white light for work or media viewing.
- Non-addressable is simple and steady for ambient light.
- Addressable offers advanced control and more time spent on customization.
- Always match the strip voltage with the controller the manufacturer recommends.
I find that knowing these standards ahead of time helps you pick the right parts and avoid surprises during setup.
How to Connect RGB Strips to Your Motherboard Safely
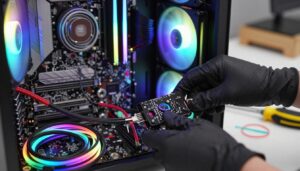
I always verify pin alignment before applying power. Always check the header pinout in your manual first. That single step prevents most hardware failures.
Match +5V, Data, Ground and Null precisely. A 3-pin connector often includes a blocked port so you don’t accidentally fit it into a 4-pin 12V header.
I have seen Gigabyte boards require a specific adapter for standard 3-pin devices. Verify manufacturer notes and pin numbers before you plug anything in.
“Double-check the pins — one mistake can fry a controller.”
- I recommend using separate headers for two led strips rather than a Y-splitter to cut clutter and reduce voltage drop.
- Always inspect each connector so power pins line up with the correct wires.
- Follow this guide and you will sync your lights with motherboard software safely and keep your gaming case tidy.
Identifying Your LED Strip Type
I inspect every strip before I power anything up. A quick visual scan often tells me whether a strip is addressable or simple. Look for tiny black chips sitting between the leds — those are the integrated circuits that enable per-pixel control.
Visual Inspection Tips
Check the wires and connector first. Addressable strips usually have three or more wires. Non-addressable options commonly show two.
- I note LED density: addressable strips often have more spacing because the ICs need room.
- I read the PCB markings and back-labels for voltage and protocol info.
- I confirm header requirements in the manufacturer specs so the strip will match my motherboard control.
“Spot the ICs and wire count — that simple check prevents mismatched power and ruined lighting.”
Do this short inspection and you’ll pick the right strip for your case. Accurate identification keeps your lighting effects reliable and protects your power and control hardware.
Navigating Proprietary Ecosystems
Closed lighting systems can make mixing parts from different brands a puzzle.
I’ve run into Corsair, NZXT, Phanteks, and Thermaltake gear that uses custom plugs and protocols. That means a fan or header from one brand may not talk with another brand’s software.
Corsair’s iCUE is a good example: it works best when all hardware is Corsair. That gives stable lighting effects, but it restricts add‑ons unless you plan ahead.
I often use adapters bought on marketplaces to convert proprietary cables into standard 3‑pin or 4‑pin headers. Some third‑party controllers also include standard ports and make integration easier.

“If you pick a proprietary controller, check for available adapters before you buy.”
- Verify that your motherboard software can talk with the chosen controller.
- Look for controllers offering standard headers to expand your options.
- Remember Thermaltake’s Toughfan uses a combined PWM + lighting cable — plan wiring accordingly.
| Vendor | Typical Connector | Ease of Mixing | Adapter Availability |
|---|---|---|---|
| Corsair | Proprietary (iCUE) | Low | Common on marketplaces |
| NZXT | Proprietary hub | Low–Medium | Some adapters exist |
| Thermaltake | Combined PWM + lighting | Medium | Limited, brand adapters |
| Phanteks | Proprietary or standard on newer kits | Medium | Often available |
Essential Tools for a Clean Setup
A tidy lighting build starts with the right tools and a plan for routing power and data.
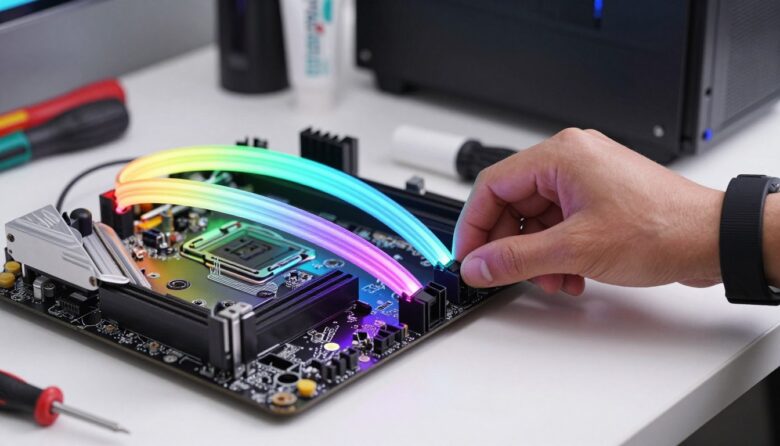
Mounting options matter. I use adhesive backing for quick installs and magnetic mounting when the steel case allows easy removal. Velcro works well for temporary setups.
I favor daisy chaining many led strips to a single lighting controller. That reduces cable clutter and keeps voltage consistent across every led.
For fans, Lian Li Uni Fan kits are a win. Their clip design and contact pads remove extra cable runs and tidy the interior around the motherboard and headers.
- I keep a reliable power source and a dedicated lighting controller for stable color and effects.
- Cable ties and routing channels make the case look professional and preserve airflow.
- Always confirm the connector is secure; a loose plug causes flicker or failure.
“Good tools, smart routing, and a proper controller make the lighting last and look great.”
| Mount | Best Use | Pros |
|---|---|---|
| Adhesive | Quick, flat surfaces | Fast install; holds well |
| Magnetic | Steel cases | Removable; no residue |
| Velcro | Temporary setups | Adjustable; reusable |
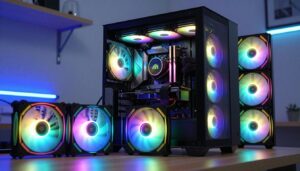
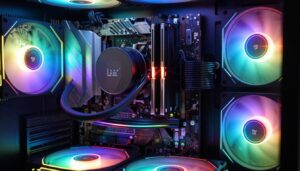
Strategic Placement for Maximum Impact
A few strategic lights can turn a bland case interior into a showpiece. Thoughtful placement makes colors pop and keeps the build clean.
Lighting Case Interiors
I usually start with the roof of the case. Placing led strips up top floods the interior with even light without harsh glare.
Diffuse options like the Phanteks Neon Combo give a solid band of color that bends smoothly around edges. That yields a premium look compared with bare leds.
Rear-mounted rgb fans read well through a windowed side panel and add depth. Avoid placing fans behind a closed front panel with no mesh—most of the light will be lost.
Avoiding Glare
I test-fit each element before final mounting. Small shifts change how colors and shadows fall across components.
- I suggest placing your led strips in the roof of your case to illuminate hardware without causing glare.
- Use adhesive or magnetic options for tight or removable installs.
- I recommend a controller so you can lower brightness and refine lighting effects.
“Test positions. The right placement makes the colors highlight parts, not wash them out.”
Managing Cable Clutter
A tidy wiring plan makes lighting look intentional, not accidental.
Daisy chaining has made my installs neater. Many manufacturers now let multiple components share a single feed. That cuts the number of cables running across the back of the case.
Lian Li’s Uni Fan kits are a big help. Their contact pads send signal between fans so fewer cables snake through the build. I use that feature whenever possible.
I keep extra sleeves and high-quality extensions on hand. They make routing cleaner and protect fragile connectors. Most modern cases include channels and tie-down points—use them.
“Tidy cables improve airflow and let the lighting do the talking.”
- I use a central controller to reduce clutter and manage color and effects from one place.
- Always check strip length so you don’t need last-minute extension cables.
- Zip ties and routed channels keep the main chamber free and the power paths short.
Managed cables make your leds look professional and keep airflow steady for reliable performance.
Software Control and Synchronization
Software is the invisible link that makes your lights behave like a single unit.
I use motherboard and vendor apps to bring every component into sync. Asus Aura Sync, Corsair iCUE, and similar programs let me map color and timing across memory, keyboards, mice, and fans. That creates a unified look for my gaming setup.

Motherboard Integration
I rely on a central controller as the brain that translates software signals into lighting effects. Some controllers accept third‑party devices so different manufacturers can play nice.
Digital protocols like SPI and DMX512 send per‑pixel commands to individual leds. That lets software change color based on CPU or GPU temperature, system load, or in‑game events.
- I sync my led strips and rgb fan when they share compatible headers or controller support.
- Set scenes and profiles in the app so colors react automatically during play.
- Always verify compatibility first—software can only manage hardware it recognizes.
“A single controller and the right app make advanced lighting effects effortless.”
Conclusion
With the right checks, your build’s illumination becomes both safe and striking. I hope this guide helped you feel ready to install and tune your lighting safely.
Verify voltage and pin alignment before you power anything. Use a compatible controller and match your led strips carefully so the hardware stays protected.
Keep software handy for easy color control and dynamic effects. I find a central app makes adjustments fast and keeps the case clean.
Enjoy a personalized setup that shows your style. Thank you for reading, and best of luck with your next custom PC lighting project.
FAQ
What are the basic steps I should follow when I want to safely attach LED lighting to my motherboard headers?
I always power down and unplug the PC first, then identify the correct header type on my ASUS, MSI, or Gigabyte board. I check the pin count and voltage on the manual, match the connector orientation, and attach the controller or strip carefully. Finally I plug the system back in and test lighting with the manufacturer’s software like Aura Sync, Mystic Light, or RGB Fusion.
How do voltage differences affect my choice between analog and digital LED tape?
I look at the strip label—most analog tapes run at 12V while addressable (digital) types use 5V. Using the wrong header or power source can damage LEDs or the controller. If my board only supports one voltage, I use an external power supply or a bridge controller to adapt safely.
What’s the difference between digital addressable strips and standard analog LED strips?
I explain it simply: analog strips show the same color across the whole length, while addressable strips let me control individual LEDs for chases and rainbow effects. Digital strips require a different header and software support, so I confirm compatibility before buying.
How can I tell what type of LED strip I have by visual inspection?
I examine the PCB: addressable strips have individually separated LEDs and usually a small controller chip near each LED. Analog strips show groups of three LEDs per segment and solder pads labeled 12V, R, G, B. The connector pin count is another giveaway—3-pin for 5V digital, 4-pin for 12V analog on many setups.
My motherboard uses a proprietary lighting ecosystem. How do I make third-party tape work with it?
I check for compatible controllers and adapters from Corsair, NZXT, or Thermaltake. Some vendors sell bridges that translate signals between ecosystems. If software locks peripherals, I use a stand-alone controller or a hub that supports the board’s header and the strip’s protocol.
What tools should I have for a tidy, reliable installation?
I keep a small toolkit: a precision screwdriver set, needle-nose pliers, cable ties, adhesive-backed mounts, a multimeter to verify voltage and continuity, and isopropyl wipes for clean surfaces. These help ensure good contact and neat routing without damaging components.
Where do I place strips inside a PC case for the best look without glare?
I position tape along the top, behind the motherboard tray, and along drive bays to create depth and avoid direct eye contact with LEDs. Using diffusers or placing strips behind opaque surfaces softens light and reduces harsh reflections on monitors or glossy panels.
How do I avoid cable clutter while running LED lines and power wires?
I route cables along case channels, use Velcro or zip ties at anchor points, and group power leads with fan cables. Hiding excess length behind the motherboard tray and using slim extension cables keeps airflow clear and the interior looking clean.
Which software should I use to synchronize lighting across a motherboard, fans, and tape?
I pick software that matches my hardware—ASUS Aura Sync for ASUS boards and compatible peripherals, MSI Mystic Light for MSI systems, and Gigabyte RGB Fusion for Gigabyte. For mixed-brand setups, third-party solutions like OpenRGB can unify control when supported.
Can I mix different LED types and still get consistent colors and effects?
I can, but I match voltage and color profiles. Mixing 5V addressable tape with 12V analog can cause uneven color or control issues. Using a dedicated controller or separate zones in software helps maintain consistent hues and effects across different components.
How many LEDs per header can I safely run without overloading the board?
I consult my motherboard manual for the max current per header, typically around 2A or lower. If my strip draws more, I run it through an external power supply or a powered hub. When in doubt, I calculate total wattage: watts = volts × amps, and keep under the rated limit.
Are adhesive-backed tape strips reliable inside a warm PC case long-term?
I prefer using both adhesive and mounting clips. Heat and dust can weaken adhesive over time, so mechanical anchors or aluminum channels extend longevity. I also clean the mounting area with isopropyl alcohol before applying the tape for best adhesion.
What safety checks do I perform before powering up lighting for the first time?
I verify connector alignment, confirm voltage and polarity, and use a multimeter to check for shorts. I also power on with the case open, ready to cut power quickly if something smells hot or behaves oddly. Monitoring temps during initial runs prevents component stress.
How do in-game lighting effects work with motherboard-controlled illumination?
I enable game integration in the motherboard or peripheral software; supported titles can trigger dynamic effects tied to health, ammo, or environment. I make sure both the game and the lighting suite are updated and that I’ve granted any necessary permissions in software.
Where can I find manufacturer guidance for pin layouts and wiring diagrams?
I rely on official manuals from ASUS, MSI, Gigabyte, Corsair, and others. Their support pages include pinouts, voltage specs, and wiring diagrams. If unclear, I contact support or consult reputable hardware forums for visual examples and user-tested advice.

Adrian Voss is an RGB lighting specialist and tech writer focused on customization, performance, and smart lighting systems. He shares hands-on insights, reviews, and setup guides to help users take full control of their RGB controllers and create immersive, personalized environments.